I really wanted to publish this blog entry about the tool, but I already have big changes coming for version 1.2. This will end up being an introduction to the tool, and a discussion of features soon to come.
Invoke-LiveResponse
This tool is basically an offshoot of Dave Hull's Kansa repo. I liked the idea, but I had some issues with the tool so I took it on as a side project to write my own tool along the same lines. The idea behind Invoke-LiveResponse is to provide a framework to perform remote live response on Windows systems in your enterprise using PowerShell scripts.PowerShell is a very powerful scripting language that can be used to retrieve valuable information from a Windows system. From past information through the parsing of forensic artifacts, present information by showing active connections, processes, and files, or future information by listing scheduled tasks or WMI event consumers.
In the background, Invoke-LiveResponse is utilizing Windows Remote Management or WinRM, which allows for the remote execution of commands or scripts. For more information regarding WinRM, see this article. While WinRM is a requirement, if WinRM isn't enabled on the target systems Invoke-LiveResponse will attempt to enable WinRM automatically. This involves creating/modifying a few registry keys and starting the WinRM service. After execution, Invoke-LiveResponse will then attempt to revert any modified settings to their original state.
Note: Currently there isn't any support for modifying Windows Firewall rules remotely to allow WinRM to work properly. This may need to be configured manually to work.
Collection Modules (in Version 1.1, just called Modules)
Collection modules are standalone PowerShell scripts that return information about a system. These are the core of the tool. I've attempted to develop modules that are relatively narrow in scope, rather than create a script that returns a large amount of information about an array of areas. For example, rather than a script that returns all forensic information regarding processes that have executed in the past, I prefer to have individual scripts with one parsing prefetch, another parsing the Application Compatibility Cache, etc.Collection Groups (in Version 1.1 called Module Sets)
Collection groups are logical groups of collection modules that you can configure for common tasks. My thoughts are to have things like, MalwareTriage1stPass, MalwareTriage2ndPass, TriageIISServer, etc.Collection groups are configured through the CollectionGroups.conf file in the .\CollectionModules directory. The format is in XML, and I've included one of my own for an example.
Here is a quick look at how to define a Collection Group:
<ExampleCollectionGroup Description="This is an example">
<CollectionModule Name="Get-ArpCache.ps1" InputValues="" />
<CollectionModule Name="Get-DNSCache.ps1" InputValues="" />
<CollectionModule Name="Get-ProcessMemory.ps1" InputValues="conhost.exe null" /></ExampleCollectionGroup>
The 3rd collection module entry is to show how to pass variables to modules that require a variable. Currently the Get-ProcessMemory module isn't released as I'm still testing the impact to target systems when it is run.
Analysis Modules (not available in version 1.1)
Analysis modules are PowerShell scripts that are run against the results of collection modules. The idea is to automate as much analysis as possible, and we can do this through the analysis modules.
My initial idea for an analysis module was to create a timeline of all events collected. This has proven to be a little more difficult than I anticipated, so this particular script will be a while in the making.
Some of my additional ideas that are in the works are a Virus Total checker that takes hashes of processes or files and returns the score on Virus Total and the date of the VT report, or flags it as "unseen". Another is to create a "rootkit revealer" which requires the normal Get-Processes API query, and the Rekall pslist or psscan, and compares the results of the two to find any hiding processes.
Plugins
There are a couple of things that I realized would differ in different environments, so I've included a "plugins" directory for a few options that can be customized further.Credentials
I have a friend that uses a privileged account manager for accounts used during incident response, so the major plugin functionality is with the -Credential switch. By default, using -Credential will just execute the Get-Credential commandlet build into PowerShell to prompt for alternate credentials.In cases where credentials are stored elsewhere, such as a Privileged Account Manager, you can write a script that interacts with the PAM's API, or whatever else you use, and return a PSCredential object. Name this script Invoke-LiveResponseCredentials.ps1 and place it in the .\Plugins directory.
NOTE: In version 1.2 this is changing to just Credentials.ps1.
Soon I will be adding a Credentials plugin script that queries the Thycotic API and returns a credential object. All you will need to do with it is replace the URL to your Thycotic instance, if this is the product you use. If anyone develops other Credentials plugins, I would be happy to add them to the repo.
GUI
Another plugin that is currently possible is the GUI. I've created my own GUI to interact with the Invoke-LiveResponse command-line script for those that prefer it. If you want, you can write your own and replace it in the .\Plugins directory.Command Line Screenshots
The first thing you'll want to do is tweak the save path and concurrent jobs settings.

If you want to change these back to the default settings (2 Concurrent Jobs, and a "Results" folder where Invoke-LiveResponse is located) you can do the following:

Next, take a look at the available modules.
Note, this parameter has changed to ShowCollectionModules in version 1.2
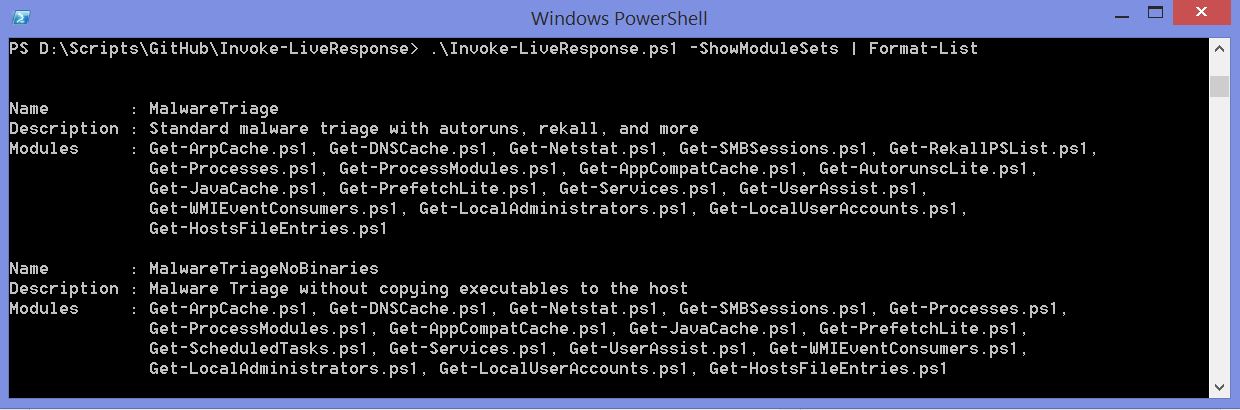
Then, take a look at the Module Sets.
Note: These are called Collection Groups in version 1.2, and the parameter changed to ShowCollectionGroups.
Finally, take a test run on your local system.

GUI Screenshots
Launch the GUI:

The GUI's main window displays collection modules on the left, and you can add and remove targets on the right using the textbox and the add or remove button.
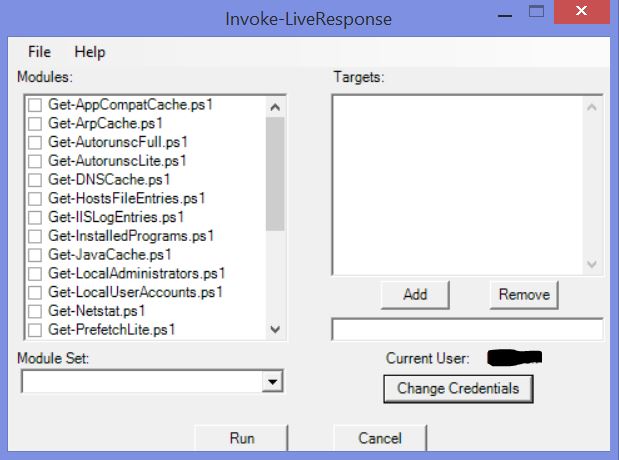
You can change the save path and concurrent jobs settings by using the File menu and selecting options.

You can check specific modules that you want to run, or you can select a Module Set (Collection Group in version 1.2) from the drop down list which will check the appropriate modules for you.
Wiki
I've attempted to summarize the ideas contained within Invoke-LiveResponse. I am working to put this content, and more, into the GitHub Wiki for the project. I plan to document each module, and maintain a roadmap for enhancements to the framework and the modules.
Very informative. Cybersecurity incident response can reduce damage, improve recovery time, and mitigate losses after a security incident.
ReplyDelete